


 As a Battle Beasts (BB) collector or Beasts enthusiast it has probably happened to you as well, or you have postponed it because of this risk, that horrible moment…

Failed attempt trying to swap backward arms on a Pillaging Polar Bear (without using the method) resulted in a broken arm…
Scroll down to the RED text directly for the solution.
AN ARM THAT BROKE WHILE TRYING TO SWAP IT, in order to fix those backwards arms or arms that are even from another Beast, restoring its original composition.
This horrific scene is something you don´t like to see with any toy let alone these 30 year old vintage toys that hold a nostalgic value as well.
And even though the risks with this rather ¨simple¨ operation can never be excluded for 100% (there is ALWAYS a risk it might go wrong!) there is a trick that does work in most cases. Over time the Beastformers Team has executed quite a few of these complex operations with solid results so it is time to share it with the rest of the BB community.
The reason for this post is a Laser Beast (LB) Flying Kickback that arrived recently with its arms backwards, which means that the left arm was positioned on the right side and vice versa, on which this solution has been successfully executed as well. While this subject, and the various solutions, have been discussed in various topics on LittleRubberGuys (LRG) before we realized it´s never been discussed out here. Reason enough to shine some light on this subject on the Beastformers Blog as well and help out those who haven´t found the right solution yet.

Gargantuan Gorilla with a broken arm showing the problem. The peg has been removed from the socket in order to show where it broke (the weakest spot).
The actual risk
Before we look into the method it is important to understand the actual risk you are taking when you decide to execute this operation because as mentioned earlier there is always the risk it might go wrong, even with this method!
What can go wrong, causing the arm to break, is the fact that the so called peg will snap there were it is the weakest. The peg is the little extension to the arm that will pop into the so called peg-hole, the socket in the body piece, of the Beast causing the arm to rotate. Point is that the tip of the peg is a bit thicker than the peg-hole so it really has to pop in or out with a certain amount of pressure in order to place the peg correctly inside the socket. And this is exactly the risk because if the friction caused while applying the pressure gets to high the thinest, weakest, part of the peg will break.

Loose Greek Battle Beasts (GBB) arms clearly showing the pegs.

The arm will in most cases always break at its weakest spot, there were the level of friction in various directions is the highest.
So friction is the major issue here that has to be reduced as much as possible in order to safely remove the whole arm from its socket. But apart from this friction reduction there´s another important element that plays a role into the successfully removal of an arm and that´s the condition of the figure itself. And this is actually the first thing you need to inspect before you can even start considering applying the method to ¨Swap Arms.¨
Condition
When it comes to the Battle Beasts line, and probably any other vintage toy line, condition is often the most used word amongst collectors and also in this case condition is a crucial word. Because even though the high quality of the material (rubber) used for the creation of the original figures was good it is the way how this has held itself over time that defines whether or not its condition is still good enough.
With these figures being produced during the mid and later eighties (1985-1988) there is quite a few things that could´ve affected the material. A lot of external influences could´ve had their effect on the rubber of the Beasts not only causing issues like discoloration but more important in this case is the fact that also figures became more sturdy and/or even ¨dried out¨ causing the original structure to change. In relation to the earlier mentioned friction issue the last thing you´d like to see is and arm of which the rubber structure, due to wrong storage/display conditions, has changed and became crumbly or brittle. In all cases that the method, that´ll be explained below, didn´t work it was due to the fact that the condition of the rubber structure of the figure had become brittle. It is in those cases that even the slightest friction or pressure can cause the arm to break, even rotating the arm as it´s normally supposed to do is a risk in those cases.
Condition in this case also relates to the surrounding in which you´re planning to execute the method because as some of you might know the figures do react to temperature changes. Not only do some figures show their rubsign element on a hot day but also the material itself is susceptible to temperature changes. This is also one of the main reasons why executing the ¨arm swap¨ without this method is more likely to succeed on a hot day or in a warm room rather than doing it under lower temperatures.
Inspection
Now, knowing these two crucial elements; Friction & Condition, it´s important to know what to look for to determine whether the figure you have in hand with wrong or backwards is good enough to work with. In order to do this here´s a couple of steps that can help;
STEP 1: ARM ROTATION
As explained under condition even rotating the arms on figures of which the rubber has become brittle can be a bit of a problem so first you test whether the arms still rotate 360° in both ways without any issue. In some cases, when the arms haven´t been rotated in a long while, this might not go very easy so be careful and don´t force anything! If the arm does rotate in both ways without issues you can consider this Step done. If it it doesn´t it can mean a couple of things. First is the fact that the peg might´ve fixed itself inside the socket and a bit more force is needed to actually cause it to rotate but in that case we´d not advice you to stretch any limits and use the tool that´s used for this method (explained below) first just in order to get the arm rotating. Please keep in mind that once the arm doesn´t move smoothly or seems to get stuck after turning it a couple of times in both ways there´s a risk it can snap at any moment! So also here goes don´t force anything and look into Step 2 first before you go on actually applying the method. A working arm of a figure in good condition should´ve no problem rotating at all. The last option there is once the arm doesn´t move at all is that it has already been broken before and it has been glued back on causing it to be a solid none moving arm, in those cases even the slightest amount of pressure is enough to break the arm again. And in this scenario the condition is obviously not in a suitable condition to continue.
STEP 2: ¨WEAK SPOT¨ INSPECTION
Once Step 1 was either a success or it has given you some doubts there is Step 2 to make the final decision on whether or not it is wise to continue. During this step you carefully try to wiggle out the arm a little bit out of its socket just enough to see if the ¨weak spot¨ shows any signs of crazing (brittleness) so this is the part where the peg is attached to the arm. In case you don´t have enough space to check this or you can´t get the arm out enough please also here make sure to apply the method first before you continue to pull or put the arm under more pressure while wiggling. If there is no sign of crazing or any cuts in that area you are (most likely) good to go and the condition of your figures is good enough to work with in order to apply the method. And if you do see any signs of crazing or cuts you have found your answer for the fact the arms wasn´t properly rotating during Step 1. At this point we´d advice you NOT to go ahead using the method and we´d even discourage you to rotate the arm at all. The more you´ll rotate the arm the more damage you´ll do to the cuts that´re already there and thus it´ll be a matter of time before the arm will break.

A flew market find 75% Bat – 25% Shark an example of an 80´s kid creation.
Why all these warnings and steps!?
Have we gone nuts coming up with all these lines and procedures for ¨just¨ a simple ¨arm swap¨ on a toy figure?
Maybe for some of you this is all unnecessary and completely overdone but believe us when we say things will change once the subject is not a flea market find figure that´s worth a couple bucks but a Beast that´s worth a couple hundreds. In that case there´s more at stake than just breaking an arm because a failure here can cause a figure that´s worth a serious amount for collectors becoming practically worthless. A figure with a broken arm or one with an arm glued back on (or repaired in any other way) is not even worth a fraction of the figure in good condition and often those end up being used in custom projects.
The Beastformers Team has executed multiple ¨Arm Swaps¨ ranging from normal Battle Beasts, Greek Battle Beasts on to the high-end Laser Beasts and even some Premium Battle Beasts figures. And once you hold a Flying Kickback or Stone Cobra in hand on which this method has to be applied you´d better know what you are doing. So all these precautions aren´t for nothing because in the end its better for everyone to ensure this procedure goes well and the figure will be preserved in good condition for the future.

When do you need an ¨Arm Swap¨?
Even though it is in most cases pretty obvious when you have a figure with the wrong arm(s) of another figure or a figure with its arm backwards it is not always that obvious. Big chance that when you have a decent size Battle Beasts collection there´s one or more Beasts that qualify for an ¨Arm Swap¨ without you even knowing about it. This is due to the fact that some Beasts have a less obvious left and right arm design, or in other words it is hard to tell apart which one is actually the left or right arm. This might sound strange but as founders of the Pugnacious Penguin Army (PPA) we realized that the Penguin is one of the figures which as a less obvious distinction between both arms. So whereas the figures with obvious arm differences, like the ones on the image above (except the Octopus), which have one Battle Arm (weapon, drill or whatever (ALWAYS the Left arm of the figure)) it is less obvious on a couple others. Just to name a few apart from the Penguin; Frenzied Flamingo, Blue Eagle, Tiger Burn, Rainbow Samu, Flying Kickback, etc.

A more obvious wrong arm composition which created a Bulky Penguin.
Due to the fact both (left and right) arms of these figures aren´t very distinct it can happen that you don´t even notice this on provided pictures so in order to prevent you from purchasing a figure like that with the wrong hands, knowing you´ll have to take a risk swapping the arms yourself, it is important to know what to look for.
What to look for?
It might sound easy, especially for experienced collectors, to avoid bumping into a situation where you end up receiving a figure with the arms on backwards but if you don´t know what to look for or are not aware of certain details it can happen to anyone. The Flying Kickback mentioned earlier, the one that inspired us to compose this article, was a perfect example of that because on the pictures we´d seen it looked like a normal figure without issues but once we received it and had it in hand the wrong arms were ¨obvious.¨ Because we knew what to look for once we had the figure in hand but it was something we couldn´t have foreseen based on the provided pictures. So even though it was a bit of a disappointment, aware of the risk of breaking it that´s always there, we´re lucky enough to conclude that the figure was in good condition and the ¨Arm Swap¨ wouldn´t be a problem.

At first sight there´s not much wrong here.
This Flying Kicback wasn´t the only time we, as pretty trained/experienced collectors, got fooled because a few years ago a beat up Rainbow Samu was purchased for a custom project (The Blue Macaw) and it was send straight from the seller to our artist. The whole process went fine and once this awesome figure finally arrived ready to join the Beastformers collection something looked weird, and yes also here it turned out that there´s something odd with the arms. In this specific case it wasn´t a fact of backwards arms which could´ve happened and overlooked once the artist was working on the piece and he´d placed them back in their sockets in the wrong way but it turned out this specific figure had two Left arms instead meaning the correct composition could´ve never been achieved with the present parts. Based on the location and the history on how this figure was found, it wasn´t that easy to find a Rainbow Samu in beat up condition for the custom project we´d in mind, we´re pretty sure this must have been a factory mistake all along. Something that can happen once left and right arms look a like but as mentioned earlier we´ve also had a Stone Cobra (Left arm is a Claw) on which this has happened so never be surprised.

The circle mark from the mold is ¨clearly¨ visible on this custom figure on the wrist armor part.
- Mold Mark Circle
In order to really tell the difference, excluding the risk of purchasing/trading a figure with backwards arms or even two left or right ones, it is wise to look for two things. First thing to look for is the circle shaped mark that´s often found on the backside (out of sight) of the arm of a Beast, but this is only an option if the pictures provided are very detailed and up close which often ain´t the case. At least not enough for such small details. - Curvature of the arm in side view
The other thing to look for and which might be more helpful, when in doubt, is to request a side view of the specific figure. Because even though the left and right arm might look almost similar on the front and back view the side view will show something interesting in case there´s an issue. When the arm(s) are on backwards you´ll see that the curvature of the arm is turned to the back whereas this is supposed to go forward.
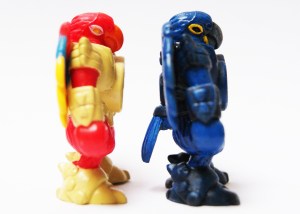
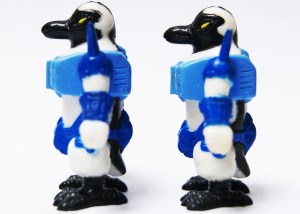
On both pictures (side views) above the figures on the Right side are the figures with the wrong arm on that specific side. As you can see here the curvature of the arms is decisive and a good detail to keep in mind when you check for issues like this.
So when it doubt whether your figure has its arms on backwards check for these two things: the Mold Mark Circle & the Curvature of the arm in Side View.
Greek Battle Beasts (Tepato Maxoi)
 As a collector and fan of the Greek Beasts this ¨Arm Swap¨ trick is very important as well because as some of you might know the arm composition of those Beasts were not in line with the composition as we know internationally. So in order to match them according to the original line there´s a whole lot of ¨Arm Swapping¨ to do.
The HAIRDRYER
By now it is clear what to look for and what to consider before you decide whether an ¨Arm Swap¨ is needed and/or wise to execute. This means we can now finally have a look at the actual trick. As discussed earlier in this article the temperature has a huge effect on the behavior of the rubber material out of which the Beasts are made. In cold conditions it´s not wise to do the ¨Arm Swap¨ even if the figure is in good condition because the material is to stiff while under warmer conditions this might even be possible without…… a HAIRDRYER. It might sound a bit weird but so far this has been the best solution for a smooth ¨Arm Swap¨ with almost all* Beasts.
With the help of a hairdryer you simply warm up, mainly, the body of the Beast in order to make it more flexible making it easier for the arms to pop in or out. Try to focus mainly on the body piece since you don´t want the arms, the pegs in particular, to become very flexible since that´ll increase the risk of failure and/or it will make it harder to pop the arms back in. Depending on the heat that´s produced by the hairdryer you´ve got to adjust the distance between the hot air and the figure because once you get to close and the temperature is to high you might actually damage the structure or it might even show signs of melting. This is obviously something you should prevent at all times.
BE CAREFUL! Make sure you DO NOT use to high temperatures and especially avoid hitting the rubsign as much as possible because to hot temperatures can cause a malfunction of the rubsign gimmick and damage a working sticker for good!
ADVICE: Please try this method out on a figure with damage or dirt or at least a less expensive one before you start executing it straight away on a more rare figure or one that holds a lot of nostalgia for you. As it´s important to built a bit of experience and get the feel of it so you know how things react.
Personally we always keep our hand close to test this because the moment it´s to hot for your hand that´s also the case for the figure. Keep in mind you don´t have to heat up your figure to a certain temperature you only need to ensure it becomes more flexible. So try to find a suitable distance and take your time because it´s better to take an extra minute or two than to rush things in this situation. Once you feel like the legs of the Beasts are flexible enough it´s time to do an attempt to pull out the arms. In some cases it´s not only a matter of pulling but you might also slightly need to rotate them at the same time in order to avoid a vacuum situation. All in all if the figure is warmed up with the help of the hairdryer, and it is in a good condition as explained earlier, it shouldn´t be to hard to pop the arms out of the body.
Once you´ve popped the arms out of their sockets and you´ve double checked that the new position of the arms is correct you repeat the procedure by heating up the body part in order to pop the arms back in. In this case it´s wise to keep the arms away from the hairdryer so they´re more sturdy and you´ll have less problems pushing the pegs back into their socket. Make sure you position the peg straight in front of the peg hole, to avoid the risk of breaking due to the arm going in under a corner, and then a simple push should do the job popping the arm back in position.
That´s all, with the right preparation, patience and care you´ll have your Beast arms swapped in no time from now on!
*Keep in mind that this method is based on the behavior of the rubber but the few Premium Clear figures are an exception here since they seem to have a more plastic type of structure meaning that even with this method it can be very tough to successfully execute the ¨Arm Swap¨ we have done it with a Striped Clear Carp but it´s not as easy and smooth as the others.
Amongst collectors there are a few other methods known as well like holding the figure in warm water for a certain period but most of these have down sides like water that can settle inside the socket and the damage it can do to the rub signs. All in all and over time after trying out multiple solutions the hairdryer really has proven to be the most efficient.
Hopefully this article was interesting and worth it so it´ll help you out and at the same time spare a lot of Beasts from broken arms in the future because remember every Beast out there counts.

After reading this article this should never have to happen again!
Good luck & Enjoy the Beasts!
The Beastformers Team

Pingback: Marked Beasts… | Beastformers Blog
and how to get out the broken peg?
Recently posted about this on the Instagram account, here’s the link; https://www.instagram.com/p/C4_QlvOsQJq/?igsh=OHkxMm43NTU1bGZ2 This should answer your question and hopefully it’ll work for you as well. Good luck and… Enjoy the Beasts!
awsome!